
Table of Contents
Gossip Encrept
第一次安裝
產生 key
consul keygen
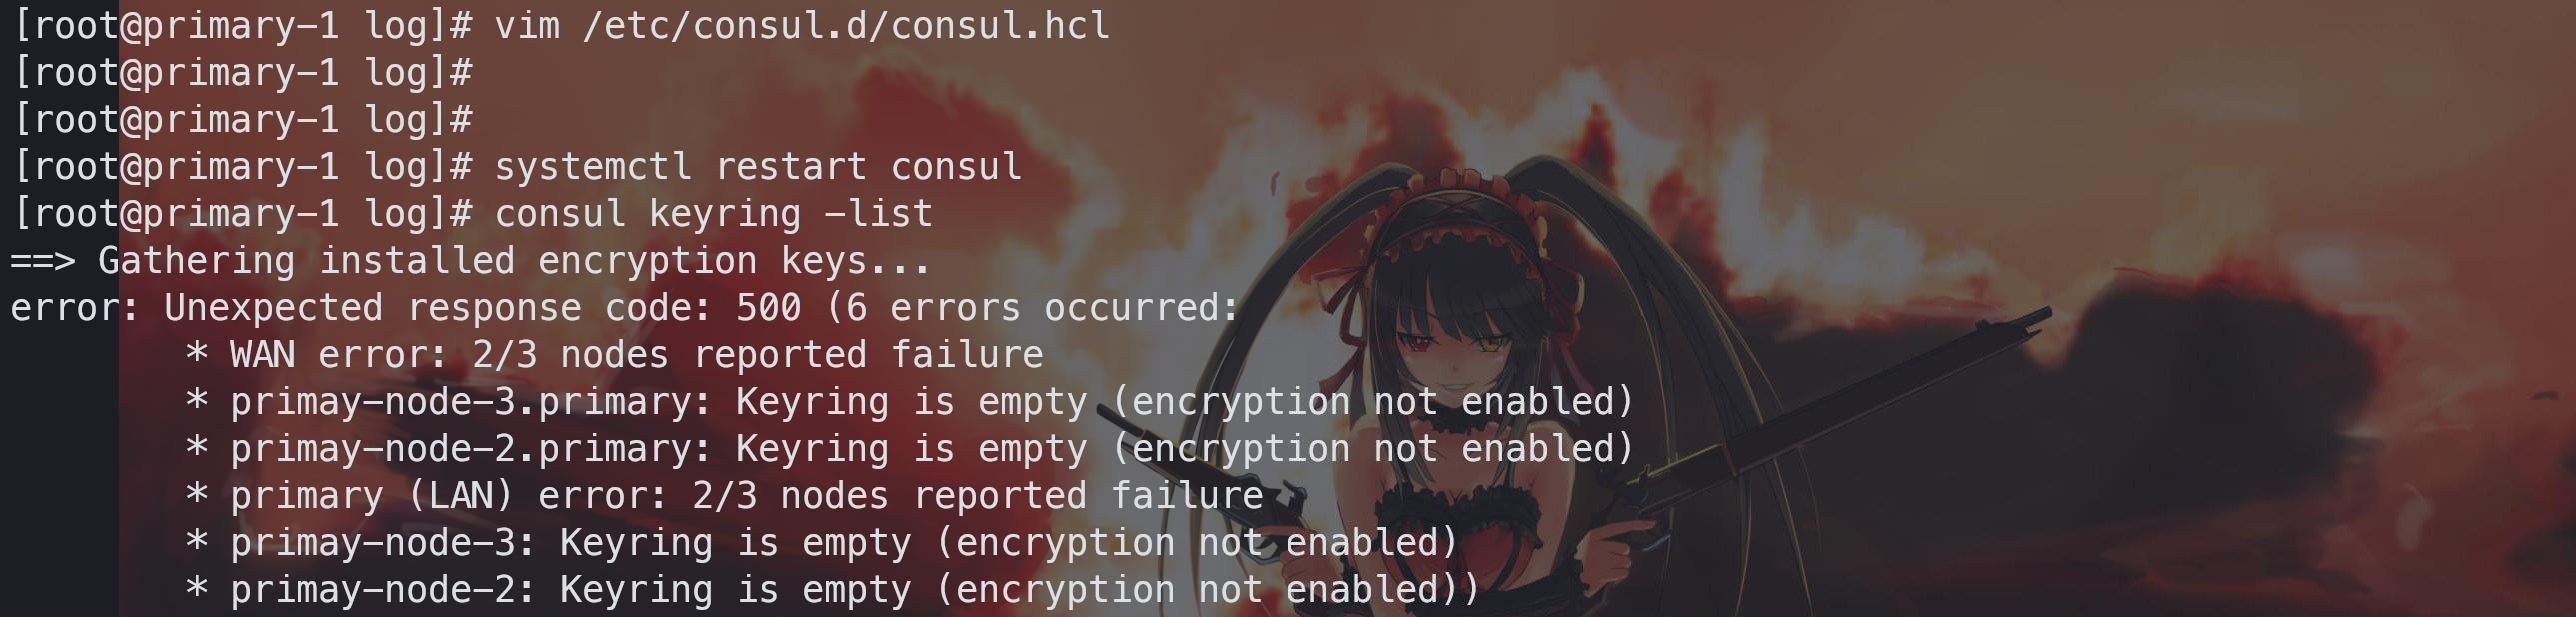
依序在 consul server 內加入以下設定檔並 restart service
encrypt                 = "xxxxxxxxxx"
encrypt_verify_incoming = false
encrypt_verify_outgoing = false
並使用指令
consul keyring -list以及consul members確認安裝情形依序將
encrypt_verify_outgoing設定成 true,然後重啟服務依序將
encrypt_verify_incoming設定成 true,然後重啟服務


Key 更新
重新 gen key
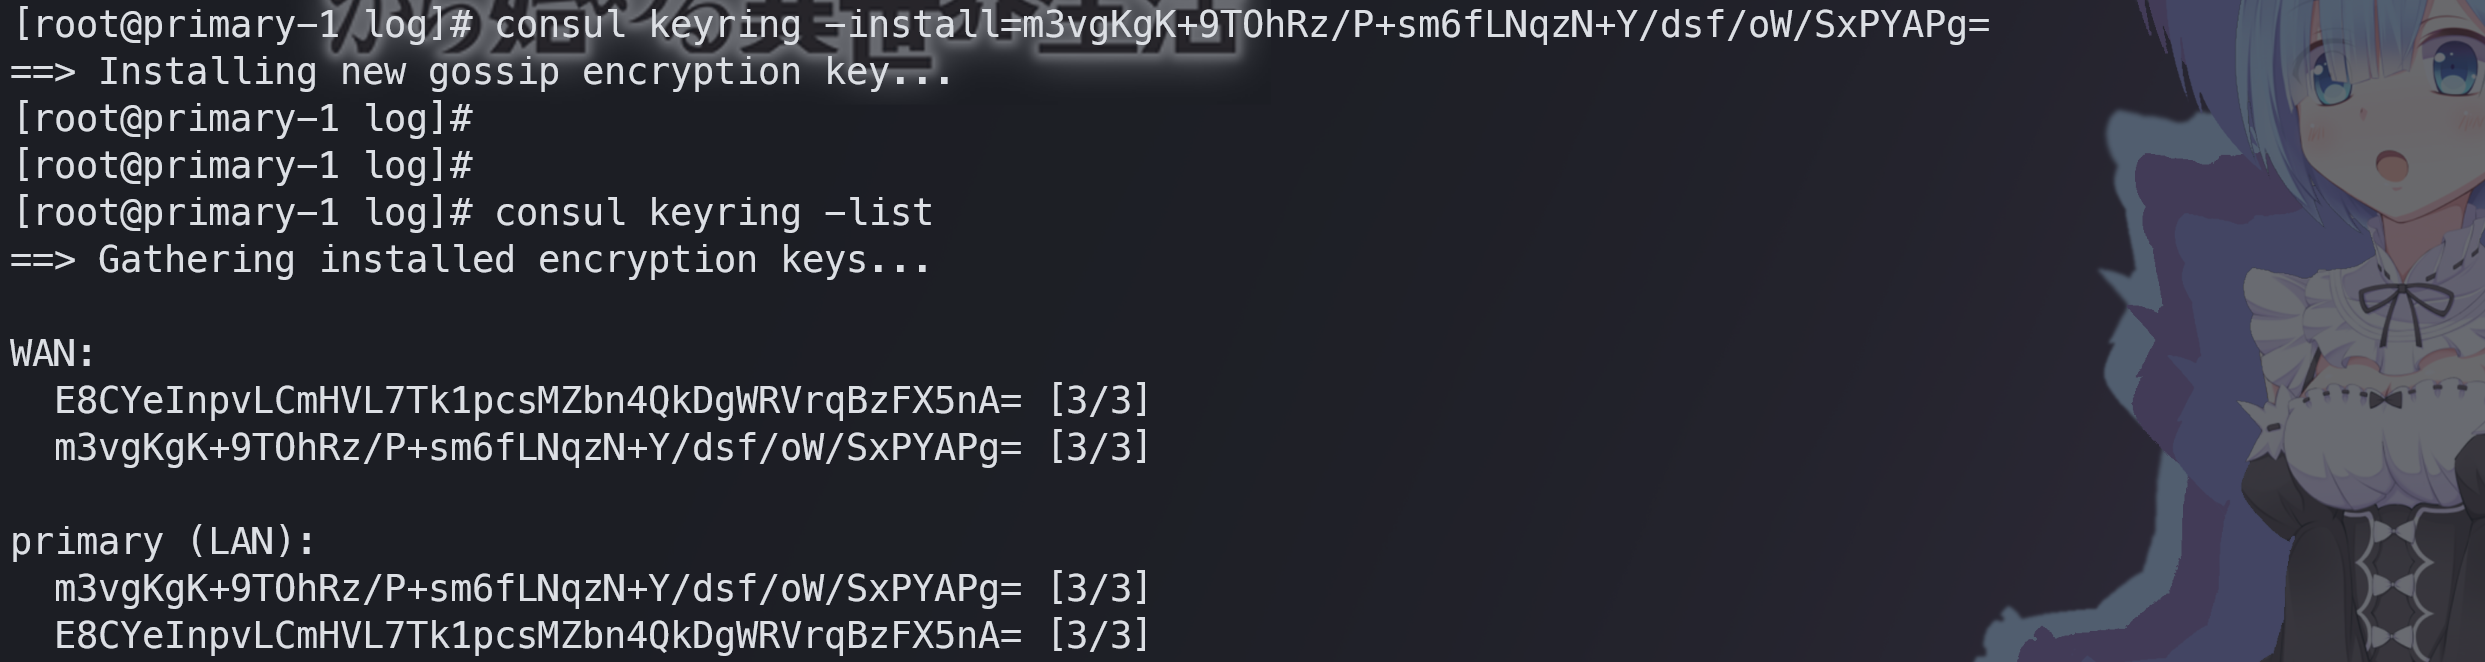
consul keygen安裝新 key,只需要在一台上作業即可,會自行廣播
consul keyring -install=$new_key宣告要使用新 key
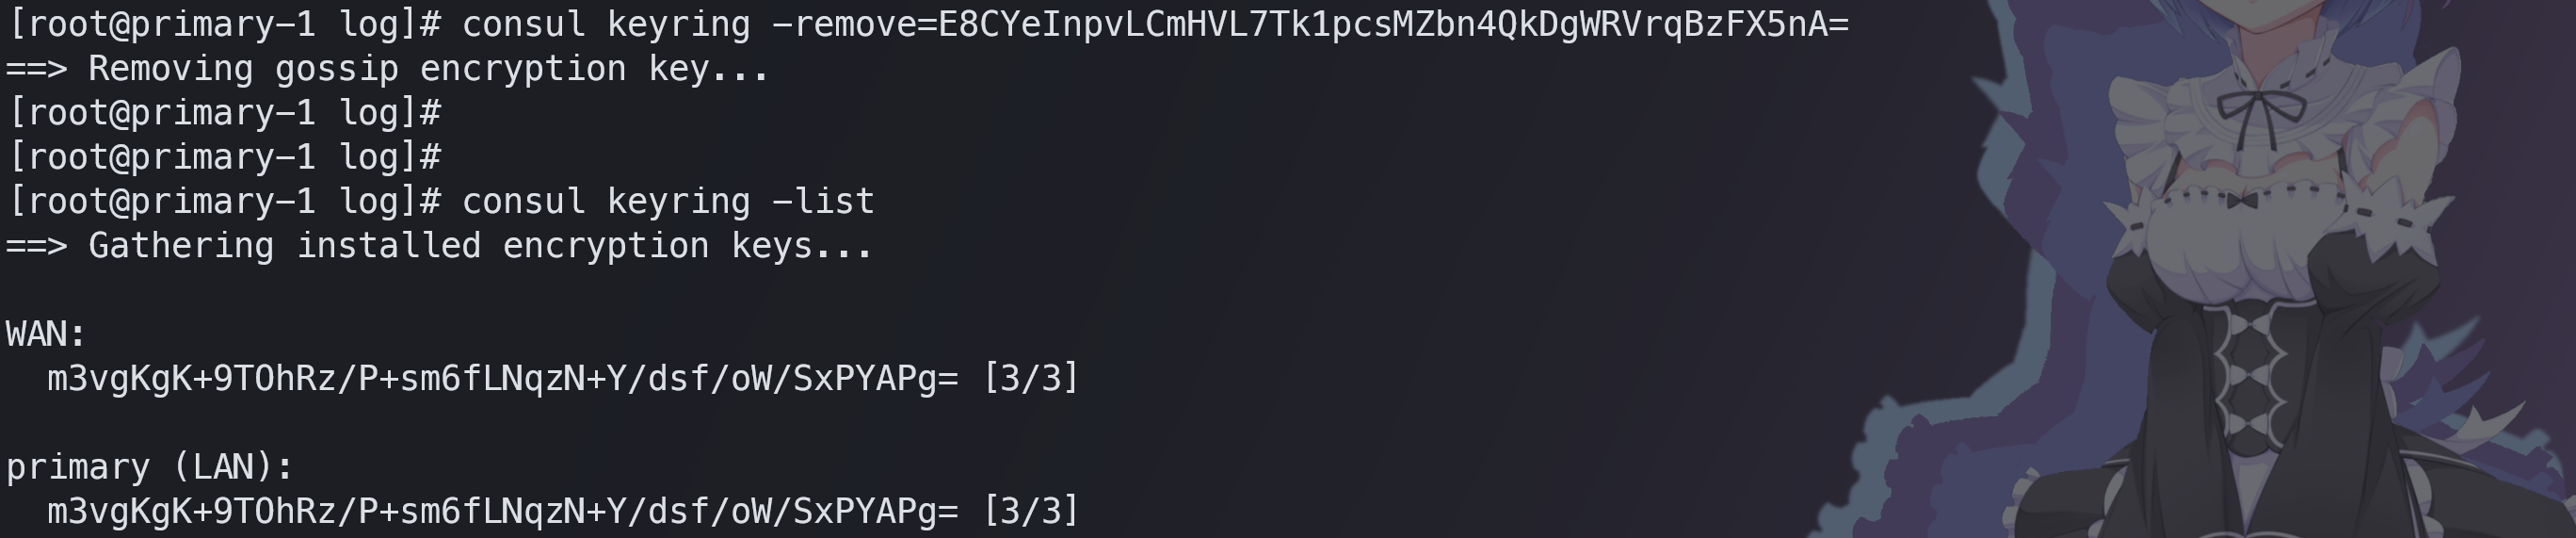
consul keyring -use=$new_key移除舊有的 key
consul keyring -remove=$old_key依序修改 consul config 即可


RPC & https
先建立 CA、Key、Cert
consul tls ca create --domain mc.consul
consul tls cert create -server -dc primary -additional-dnsname="*.dc2.consul"
依序將 CA、Key、Cert 以及以下設定加入到設定中
ports {
 https = 8501
}

tls {
 defaults = {
   ca_file         = "/etc/consul.d/certs/mc.consul-agent-ca.pem"
   key_file        = "/etc/consul.d/certs/primary-server-mc.consul-0-key.pem"
   cert_file       = "/etc/consul.d/certs/primary-server-mc.consul-0.pem"
   tls_min_version = "TLSv1_2"
   verify_incoming = false
   verify_outgoing = false
 }
 internal_rpc = {
   verify_incoming = false
   verify_outgoing = false
 }
}
依序將
verify_outgoing設定為 trueinternal_rpc = { verify_incoming = false verify_outgoing = true }依序將
verify_incoming設定為 truetls { defaults = { ca_file = "/etc/consul.d/certs/mc.consul-agent-ca.pem" key_file = "/etc/consul.d/certs/primary-server-mc.consul-0-key.pem" cert_file = "/etc/consul.d/certs/primary-server-mc.consul-0.pem" tls_min_version = "TLSv1_2" verify_incoming = false verify_outgoing = true } internal_rpc = { verify_incoming = true verify_outgoing = true } }
httpsordefaults中要不要設定成 true 需要看會不會需要透過這台看 ui。
如果要把 http 關閉,只需要設定:ports { http = -1 }
ACL
在所有機器增加以下設定,並重啟服務
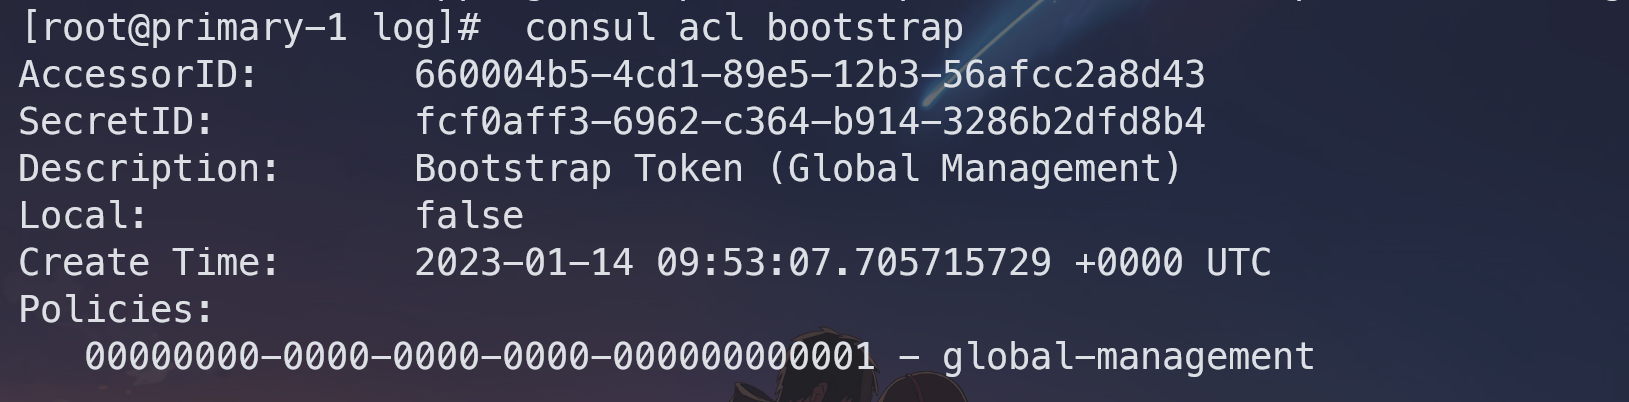
acl {
 enabled                  = true
 default_policy           = "allow"
 enable_token_persistence = true
}
建立 Bootstrap Token (Global Management) token
consul acl bootstrap建立 all node wirte policy
agent_prefix "" {
 policy = "write"
}
consul acl policy create -name "all-node-write" -description "all node read-write" -rules @rules.hcl -token "" { "operator": "write" }consul acl policy create -name "operator-write" -description "operator-write" -rules @rules.hcl -token "" 建立 agent role
// agent-role.json { "Name": "consul-agent", "Description": "Consul server default agent role", "Policies": [ { "Name": "all-node-write" }, { "Name": "operator-write" } ] }curl --request PUT --data @agent-role.json --header "X-Consul-Token:" http://127.0.0.1:8500/v1/acl/role/ |jq % Total % Received % Xferd Average Speed Time Time Time Current Dload Upload Total Spent Left Speed 100 560 100 560 0 0 70000 0 --:--:-- --:--:-- --:--:-- 80000 { "ID":"95037bce-41bf-3b2a-903b-56e1d7ab5fbd", "Name":"consul-agent", "Description":"Consul server default agent role", "Policies":[ { "ID":"988d06c7-8688-fe02-bcd7-15a9d9a822ec", "Name":"all-node-write" } ], "Hash":"wzDOec9MDtG87vdsDSB0nswnznlmzOLV99K7GcxbpA0=", "CreateIndex":4072, "ModifyIndex":5146 } 建立 token
// token.json { "Description": "Consul agent token'", "Roles": [ { "Name": "consul-agent" } ], "Local": false }curl --request PUT --data @token.json --header "X-Consul-Token:" http://127.0.0.1:8500/v1/acl/token/ |jq 將 token 加入設定並修改 default policy
acl { enabled = true default_policy = "deny" down_policy = "extend-cache" enable_token_persistence = true enable_token_replication = true tokens { agent = "516e8828-7340-aad8-805d-b6c6ebcf5dae" agent_recovery = "758f8192-e282-b65b-4ee8-1c48da307b06" replication = "95581b13-2991-e18c-0487-d65b859ec7e8" } }
這裡列出各種 default token 所使用的 policy
agent:
node_prefix "" {
policy = "write"
}recovery:
agent_prefix "" {
policy = "write"
}replication:
{
"acl": "write"
}
{
 "operator": "write"
}default:
service_prefix "" {
  policy = "read"
}

node_prefix "" {
  policy = "read"
}

query_prefix "" {
  policy = "read"
}